Posts

Showing posts from 2016

Joyofquilting's Crochet Corner

Image
These videos I made are for my Beginner Crocheters from the last few months beginners days. And of course anyone else who may be interested. Crochet is such a wonderful craft. Non Crochet people are always amazed at how we can wiggle a hook and create magic! See more of what I have been Stitching  Crochet 2021 My Crochet Videos  This first one shows how to Crochet the U.K. Treble Stitch (US double Crochet) This is the go to stitch for general Crochet. I'm thinking Granny Squares, Crochet Throws/Blankets, Shawls etc. The one below moves on to making a basic Granny Square And for my fellow Lefties Below is a video showing how to Crochet the Treble Stitch left handed And finally the Basic Granny Squares for left handers. Give It A Try  Remember,  you can Pause, Fast Forward and Rewind As often as you need to. Have fun. Looking back.  And So the Crochet Begins And while your here,  Check out My Other  Social Media Links Thanks for talking time out of you

Quilt As You Go All Finished - Well Almost

Image
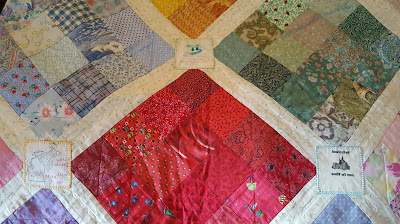
Quilt as you Go I've just finished my Lynne Edwards Sampler Quilt. I really like it. We did use  a few non Lynne Edwards blocks. Just because I liked them. I intend doing some hand quilting in the sashing. But that can wait a while. Meanwhile here are some pictures. Sampler Quilt  I made twenty blocks. This is the back of the quilt. I used up all my scrap pieces to make the back. Close ups of the quilting - back view. Close up of some patterned stitching I used for quilting. See the black blur/smudge at the bottom of the quilt? That was my new kitten Sparky darting across the quilt! So it looks like Daisy and I have a new apprentice to help us quilt. Quilt As You Go This project used Quilt as you Go joining. It's a lovely way to work as each Block is complete including Quilting before being joined together to make the whole Quilt. More about Quilt as you Go I would be thrilled if you checked out my other 

Talking Quilts

Image
I wanted to let you all know that The Quilters Guild of the British Isles Talking Quilts Project is now live on-line. I was involved both as an Interviewer and an Interviewee  (is that a real word?) Here are a few pictures of my YK2 Quilt which I was interviewed about. The link below will take you to the  Wales page which is where all the interviews I took part in are. You can either read or listen to the interviews and look at pictures of the quilts. http://www.talkingquilts.org.uk/interviews/wales/ ENJOY! And then check out my  Social Media Links

Finishing Off - Binding your Quilt

Image
Quilt as you Go  Quilt Binding  As our  Sampler Quilt Blocks  have all been made and we start stitching them together, our thoughts turn to finishing our Quilts. And that involves squaring off, making the binding and attaching the binding. All these Quilts were made using the Quilt as you Go method.  Find out more about joining  Quilt as you Go Sampler Quilts  Below are the first three finished Quilts. Then scroll down to the bottom of the page to see my three videos.  1. Squaring a Quilt.  2. Making Quilt Binding.  3. Attaching binding to your Quilt.                                Heulwen' s Sampler Quilt Mary's Sampler Quilt Yvonne' s Sampler Quilt How I Square Up A Quilt  This first video shows how to square up your quilt. Marking Quilt Bindings This second video shows how to make quilt binding Attaching Your Quilt Binding  And this third one shows how to attach the binding to your quilt Have fun.  Mind you the above is a lot o

Making a Block Keeper

Image
A few people have been asking how to make my Block Keeper.  So I thought I should repost a link to my Video Tutorial. First some pictures of said Block Keeper. Sew - here is my Quick and Easy Block Keeper Video Tutorial And here is a link to  My Social Media Links I'm particularly enjoying Instagram at the moment. 

Quilt as you Go

Image
Quilt as you Go  Sampler Quilt Blocks For all of you who want to know how I put together my Sampler Quilt Blocks.    This was a good Quilt to make to help my group expand their Patchwork and Quilting skills.  Each Block was a complete piece of work. With the top wadding and backing and Quilting. This meant we were only ever dealing with a small piece of work. This Tangled Star proved quite a challenge for many. Even I had to have quiet and really concentrate while making it! I do like the echo Quilting on this Block. Nice Socks included with this Block! The Bow Tie was a lovely Block to make. I felt mine looked like a Box of Milk, White and Mint Chocolates! Yum Yum! And here it is finished and displayed on my sofa. The Binding I quite enjoy making and attaching my Quilt Binding. It signals I'm coming towards the finishing line of my Quilt. And what a difference visually once the binding is on a Quilt. Find out how I  Make and Attach My Bindings Quilt As You Go Video It&#

Lions & Tigers & Bears Oh My

Image
Can you spot the mistake? - it's quite a major one. This is what sometimes happens when us quilters get over exited working on a project. I finished putting this quilt top together and laid it out to consider how I wanted to quilt it. Um......that's a strange way I've put those colours together I thought.  Why did I put all the pink on one side of the quilt? That was an odd thing to do. Then it hit me - I pieced the top in two halves - In my excitement to get the top completed I'd stitched and joined them together the wrong way around - Oh My! There's no way I'm unpicking it - all the letters have been heat n bonded and stitched down.  And there is hardly any of the fabric left to make new So on to plan B  I did have some flowers I'd cut out earlier and not used.  I needed to bring some pink over to the left side. I only had two Pink Flowers but visually odd numbers are better.  So I'm using a yellow one as well.  I&

Celebration

Image
I managed to spend some time lately working on my own projects. I'm making a series based on some of my favourite photographs.  I've always loved taking pictures and the digital age means I can snap to my hearts content. I'm currently working on five pieces inspired by my photographs. This one was taken in Alykanas on the Greek Island of Zante.  Our favourite spot for a relaxing holiday.  On this visit we were (still) celebrating our 40th Wedding Anniversary. So I've printed out part of the above picture in black and white quick print so I could cut out and use the part I wanted as a template to make the fabric figures. I kept it simple and used one of my go to work horse fabrics, Osnaburg, to create a piece of Applique. Which I then outline stitched onto a background fabric. I added some nice wavy Machine Quilting  Job Done! I'm pleased with that.  It keeps the 'Essence' of the original picture for me. It's propped up agains

William & Daisy

Image
Yey - had a lovely play day today working on my own little project. Inspired by a photo I took of my Grandson and dog last year. It's lovely to take and have pictures.  But sometimes I feel the need to commit a memory to fabric. Using some fabric I had hand painted,  some freemotion quilting and appliqué - and a touch artistic licence (I changed the direction Daisy was running in). Some scraps of fabric for the binding. It's all finished and hanging proudly on my wall. Again, I quick printed out this picture so I could use it to make templates. Choosing fabrics to match the picture I Appliqued William & Daisy onto a fabric background.  Added some wadding, machine stitched wavy lines. Added a colourful binding.  An another Memoty Picture Finished. This takes me right back to when William had his first walk on 'Our Beach' Aberavon Beach, Port Talbot. See my other  Social Media Links

Grandmothers Pride

Image
Quilt Block Grandmother's Pride Beginners Guide to how I Rotary Cut To make this block you need two different fabrics a dark (feature) fabric and a light (background) fabric.   From the dark (feature) fabric cut: 9 x Two and seven eighth inch squares. From the light (background) fabric cut: 4 x Two and seven eighth inch squares. 4 x Three and a quarter inch squares - Cut these squares in half on the diagonal (corner to corner) this gives you 8 triangles. These go around the outer edge of the blog. And 2 x Two and a quarter inch squares - Cut these in half on the diagonal (corner to corner) this gives you 4 smaller triangles which form the corners of the block. Use quarter inch seams throughout.  How I use my Quarter Inch Foot Lay the squares and triangles out next to your sewing machine.  You need to stitch them together in diagonal rows  ( see pics above and below) nice slippers!  Stitch the rows together And you'll end up with this. Quite a neat

Fidget Quilts

Image
I hadn't heard of Fidget  Quilts until a few months ago.  And once I had I wanted to find out what they were. A Google search quickly educated me about them. They are small lap sized quilts (about 20") with items such as buttons, zips, pockets etc securely stitched on for the recipient to fiddle with and so sooth restless hands. Typically they are made for people with Alzheimers/dementia or any other condition where the user would be comforted by occupying restless fingers. Coincidentally at around the same time a friend of mine asked if I knew anyone who made Fidget Quilts as she wanted one for her mum. Of course I jumped at the chance to make her one myself. I then took it to my Quilting class to encourage others to make them. They are lovely projects to make. They don't take too long and you get to be quite creative and playful.  The three pictured are my original one and the first two that class members have made.